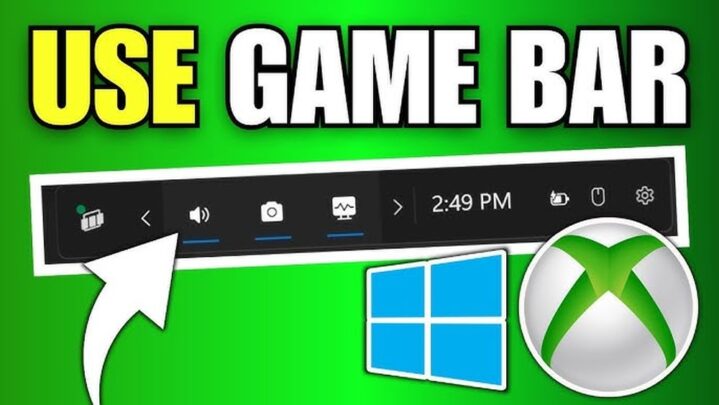
The Xbox Game Bar in Windows 11 is more than just a simple overlay—it is a powerful toolkit designed for gamers who want to record their sports gameplay, capture highlights, or stream their sessions live.
Built directly into Windows 11, the Xbox Game Bar eliminates the need for third-party software by offering native recording, screenshot capabilities, and basic streaming functions. With an intuitive interface and customizable settings, it is an ideal choice for both casual and competitive players looking to share their sporting triumphs.
Enabling Xbox Game Bar
Before diving into screen recording or capturing clips, the first and most important step is making sure the Xbox Game Bar is actually enabled on your Windows system. Without this simple step, none of the overlay features, recording tools, or game performance tracking will work.
To ensure the Xbox Game Bar is active:
- Open the Settings app
You can do this by pressing Windows + I on your keyboard or searching for “Settings” in the Start menu. - Navigate to the Gaming section
In the Settings menu, locate and click on the “Gaming” category on the sidebar. - Select ‘Xbox Game Bar’ from the submenu
This section contains all the preferences related to the Game Bar’s functionality. - Toggle the feature on
Make sure the option labeled “Enable Xbox Game Bar for things like recording game clips, chatting with friends, and receiving game invites” is switched On. - Confirm the shortcut is functional
The default keyboard shortcut to launch the overlay is Windows + G. Try pressing it to make sure the Game Bar pops up while a game or application is running.
Recording Gameplay
Once the Game Bar is enabled, recording your sports gameplay is just a few clicks or keystrokes away. Begin by launching the game or application you want to record. Press Windows + G to bring up the Game Bar overlay.
Locate the Capture widget and click on the Start Recording button or simply press Windows + Alt + R to begin recording instantly. When you are done, press Windows + Alt + R again or click Stop Recording.
The system automatically saves recordings in your Videos > Captures folder, making it easy to locate and edit them later. This functionality is particularly valuable for those who need instant playback or highlight creation.
Configuring Audio Settings
Audio is a critical part of any sports gameplay recording, and the Xbox Game Bar gives users flexibility to customize what gets captured. Within the overlay, click the Settings icon, then find the Capturing section. You will see options to capture:
Game: Only the game’s audio
All: All system sounds including notifications and background apps
None: No audio at all
Make sure the microphone option is also enabled if you plan to include live commentary or personal reactions. Proper audio configuration is essential for clear, professional-grade content.
Streaming Gameplay
Though not its primary function, the Xbox Game Bar also allows basic streaming of gameplay sessions. To begin, launch the overlay and look for the Broadcast feature. From there, you can initiate a live stream and share your sports gameplay or related content with viewers.
For example, many sports gamers use the tool not only to capture gameplay but also to stream draft prep sessions, including fantasy football auction drafts where strategies and picks are discussed live with their communities. Streaming through Xbox Game Bar offers a convenient way to connect with your audience in real time, whether you’re on the field or planning your fantasy roster.
Streaming directly from the Game Bar is particularly convenient for players who want a streamlined experience without the complexity of external broadcasting tools.
Recording Storage Location
Once you’ve captured your gameplay using the Xbox Game Bar, the next logical question is: where are the recordings saved? By default, all videos and screenshots taken via the Xbox Game Bar are automatically stored in a dedicated folder located at:
C:\Users\[YourName]\Videos\Captures
This predefined location is part of Windows’ default media folder structure, which helps keep your files organized and easy to find without any setup required.
Understanding where your recordings go is essential—especially if you’re planning to edit clips, upload them to social media, or simply review your gameplay. While the default folder works well for most users, Windows also allows you to customize the save location if you’re running low on space or want to store files on an external drive.
Default Folder Advantages:
- Centralized location: All your clips and screenshots are grouped under one folder, making access simple.
- Quick access via File Explorer: Just open your “Videos” library and click on the Captures folder.
- Auto-management by Windows: Since it’s part of your user profile, it’s backed up with your regular files (if you use OneDrive or File History).
- Ready for editing or sharing: Files are stored in MP4 format, which is widely compatible with video editors and sharing platforms.
- No confusion: You don’t have to guess or search—everything goes to one consistent spot unless you manually change it.
How to Change the Save Location (Optional):
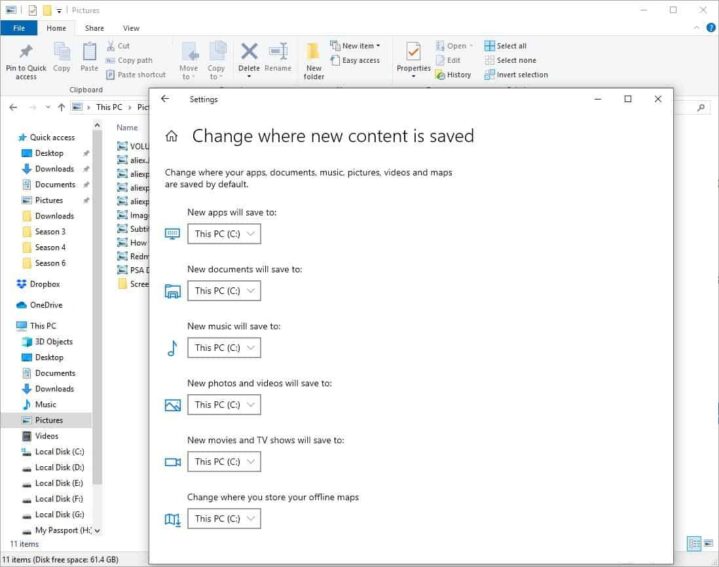
If you’d like recordings to go somewhere else, such as another drive or a custom folder:
- Go to Settings > System > Storage.
- Scroll down to “More storage settings” and select “Change where new content is saved.”
- Under “New videos will save to:”, choose your preferred drive.
⚠️ Note: While this lets you pick a different drive, you cannot change the specific folder used by the Xbox Game Bar within that drive.
Knowing the storage location is crucial not only for organizing your content but also for managing your disk space efficiently. Whether you’re building a highlight reel, posting to YouTube, or just saving memories from your favorite game, having a clear grasp of where your files live gives you full control over your media.
Supported Shortcuts
When it comes to recording gameplay—especially fast-paced sports titles like FIFA, NBA 2K, or Rocket League—speed and precision are everything. You can’t afford to dig through menus mid-match or miss a key moment while fiddling with controls.
That’s where the Xbox Game Bar’s built-in keyboard shortcuts come in. These hotkeys allow you to instantly activate features like recording, screenshot capture, and broadcasting—without ever leaving the action.
Whether you’re trying to grab a replay-worthy goal, mute your mic during a stream, or start a quick capture before a buzzer-beater, these shortcuts give you immediate access to essential tools.
Essential Xbox Game Bar Shortcuts:
- Windows + G
Launches the Xbox Game Bar overlay.
This is your central dashboard. Use it to access widgets for performance tracking, audio levels, screen capture, and chat integration. - Windows + Alt + R
Starts or stops screen recording.
Great for capturing spontaneous highlights. You’ll see a small recording overlay with a timer in the corner of your screen to confirm it’s working. - Windows + Alt + Print Screen
Takes a screenshot of your active window or game.
Ideal for grabbing crisp stills from gameplay for thumbnails, memes, or social media posts. - Windows + Alt + M
Mutes or unmutes your microphone.
Super handy if you’re recording commentary or streaming and need a quick way to go silent without disrupting the flow. - Windows + Alt + B
Starts or stops broadcasting live.
A single command to go live or end your stream. This works with connected services like Twitch when broadcasting is configured.
Public Perception
The Xbox Game Bar is applauded for its ease of use and built-in integration with Windows 11. Players appreciate how it enables content creation without the need for complex setups or additional downloads.
However, it does come with limitations—users cannot record the desktop or File Explorer windows, which can restrict content outside of full-screen games or apps. Still, its value as a plug-and-play recording tool remains undisputed among the gaming community.
Active Advocates
Microsoft, the creator of Windows 11 and the Xbox Game Bar, plays a significant role in promoting and continuously updating this tool. Regular updates are pushed to enhance functionality, compatibility, and performance.
Beyond Microsoft, gaming communities themselves are passionate advocates, praising the tool’s integration and minimal performance impact during sports gameplay recording or streaming.
Why Gamers Prefer Xbox Game Bar
Unlike third-party programs that demand installation, licensing, or subscriptions, the Xbox Game Bar comes pre-installed with Windows 11 and is free to use.
This makes it a go-to choice for budget-conscious streamers and recorders, especially those in the sports gaming niche.
There is no hassle—just hit your shortcut and start capturing every goal, dunk, or clutch moment.