When preparing photos for print, you can’t just take any image and send it off to the printer. Images intended for online use are often lower in resolution, making them unsuitable for printing. Print demands precision, and ignoring it might leave you with blurry or pixelated results.
By properly resizing and cropping, you maintain the integrity of the image while ensuring it looks exactly as you envision. To see what this looks like, check some of these photo albums.
Pixels, DPI, and Print Size

The relationship between pixels, DPI, and print size is what determines the final quality of your photo.
- Pixels: These are the tiny building blocks of a digital image, and the more pixels you have, the sharper and more detailed your image can be. When printing, having a sufficient number of pixels is crucial to prevent blurriness.
- DPI (Dots Per Inch): This measures how many dots of ink a printer places in each inch of your photo. Higher DPI values, such as 300, are perfect for sharp, professional-quality prints. A lower DPI can lead to pixelation, where individual dots or pixels become visible. Always double-check your DPI settings before hitting print.
- Print Size: This refers to the physical dimensions your image will take on paper, like 5×7 or 8×10 inches. Print size depends on both the pixel dimensions and DPI. For example, an image with 3000×2000 pixels will print cleanly at 10×6.67 inches at 300 DPI. If you try to stretch beyond those limits, the image loses clarity and looks unprofessional.
Tools That Make It Easy
You don’t need to be a tech genius to adjust your photos; plenty of accessible tools can help. Some are free, while others offer professional-grade features for those wanting more control.
Adobe Photoshop or Lightroom
These are industry leaders known for their robust editing options and precision. While they might seem intimidating at first, they provide tutorials and guides to help you get started. For those serious about photo editing, these are worth the investment.
Canva

With its drag-and-drop interface, Canva is beginner-friendly and perfect for quick resizing and cropping. It’s a great tool for non-designers who still want polished results without too much effort.
GIMP
This free, open-source software offers many of the same features as Photoshop. It’s perfect for those who want powerful editing tools without the cost of a subscription. With practice, GIMP can handle even advanced resizing tasks.
Online tools like Fotor or Pixlr

These are web-based platforms that allow you to make quick adjustments without downloading software. They’re excellent for on-the-go edits or when you need something done fast.
Resizing Photos for Print
Step 1: Check the Resolution
In most editing tools, you can view the image details, including its pixel dimensions. If the resolution is too low for your desired size, you risk a blurry print. At this point, you might consider finding a higher-resolution image or resizing strategically.
Step 2: Adjust Image Size
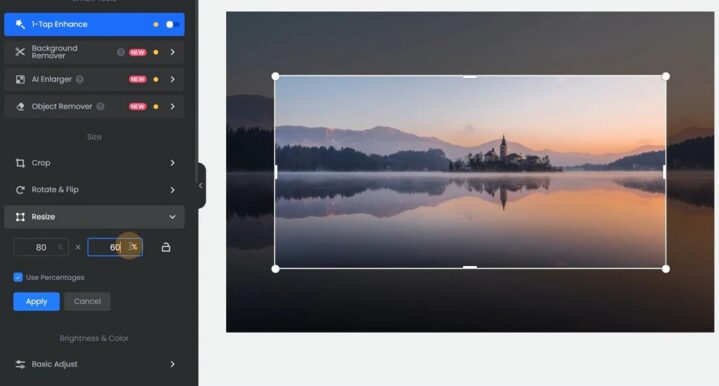
Open your editing tool of choice and find the resizing option under “Image Size” or a similar menu.
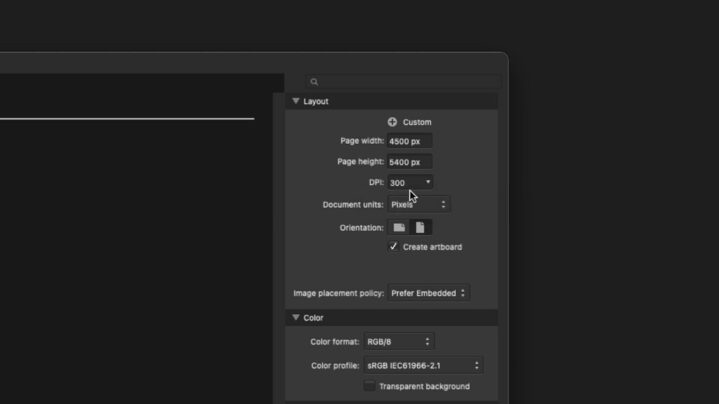
Set the resolution to 300 DPI, ensuring it’s ready for print. This step is critical, as lower DPI values are only suitable for web use.
Adjust the width and height while keeping an eye on the maximum printable size. Tools often display warnings if you exceed the resolution’s capabilities. Always preview your changes to catch potential issues.
Step 3: Lock the Aspect Ratio
Maintaining the original proportions is non-negotiable when resizing. Stretching or squishing your image will distort the subject and reduce its aesthetic appeal. Most tools have a “lock” or “chain” icon, which ensures the aspect ratio remains constant as you adjust dimensions.
Cropping
Choose Your Aspect Ratio
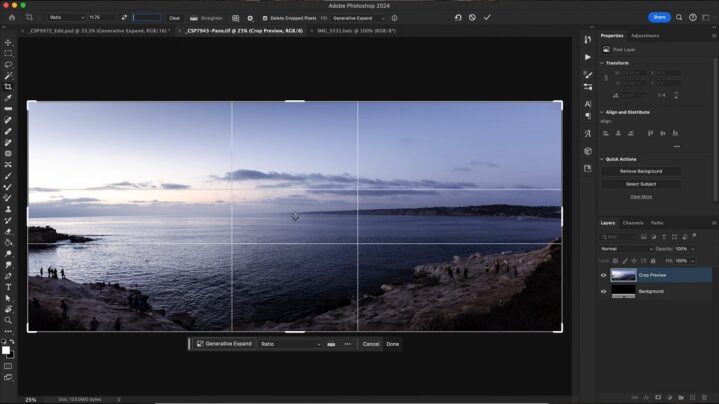
Deciding on an aspect ratio sets the stage for how your photo will fit within a frame. Ratios like 4:3 or 16:9 work well for specific purposes, such as photo albums or widescreen displays. For custom framing, adjust the crop tool to match the dimensions of the frame you plan to use.
Frame Your Subject
When positioning the subject, think about balance and visual flow. Avoid placing the subject dead-center unless symmetry is your goal. Use the rule of thirds, aligning key elements along the grid lines for a more dynamic composition.
Preview Before Finalizing
Take a moment to preview how the cropped image will look once printed. Does it emphasize the right details? Is the subject properly centered or aligned? Previewing also helps catch mistakes like cutting off important parts of the image, so don’t skip this step.
Common Mistakes and How to Avoid Them
Even experienced editors slip up. Let’s look at common resizing and cropping blunders so you can avoid them.
- Upscaling Too Much: Pushing a small image to a larger size leads to noticeable pixelation. If you absolutely need a larger print, consider using tools designed for AI-based upscaling, like Adobe’s Super Resolution or Gigapixel AI.
- Forgetting to Save a Copy: Overwriting the original file with your edits can backfire if you need to make further changes later. Always save your edits under a new file name, creating a backup of the unaltered original.
- Cropping Too Tightly: While zooming in can draw attention to your subject, cutting too close leaves no room for matting or framing. Always leave a margin, especially if your print will be displayed in a frame.
A Quick Note on Paper and Printers
Your choice of paper and printer significantly impacts how your photo turns out. Even the best-edited image can fall flat on poor-quality materials.
Glossy paper is ideal for vibrant, high-contrast images, as it enhances colors and adds a professional finish. Matte paper, on the other hand, is perfect for soft, timeless looks or black-and-white photography. Check your printer’s settings to match the paper type, and always use high-quality ink for consistent results.
Your printer should also be configured for the image’s DPI and dimensions. Many printers have presets for specific photo sizes, which can save time and ensure accurate results.
Wrapping It All Up
Resizing and cropping photos for print is definitely a skill worth mastering. With the right approach, tools, and a touch of patience, you’ll see your images come to life in beautiful detail.
